7 Listing Photo Tips for Better AI Real Estate Videos
Seven practical tips for preparing real estate listing photos that produce the best AI-generated property videos — covering photo types, exposure, and what to cut.
· Sophie
Listing VideosThe quality of an AI-generated real estate listing video is determined almost entirely by what you put in. AI tools can assemble, sequence, and animate — but they cannot fix dark rooms, blown-out skies, or a photo set missing half the property.
These seven tips cover exactly what to give the AI to work with.
Summary: For the best AI listing video results, include a hero exterior, one wide shot per room, a dedicated kitchen shot, and detail photos. Keep exposure and white balance consistent across the full set, and cut any photo that does not add value.
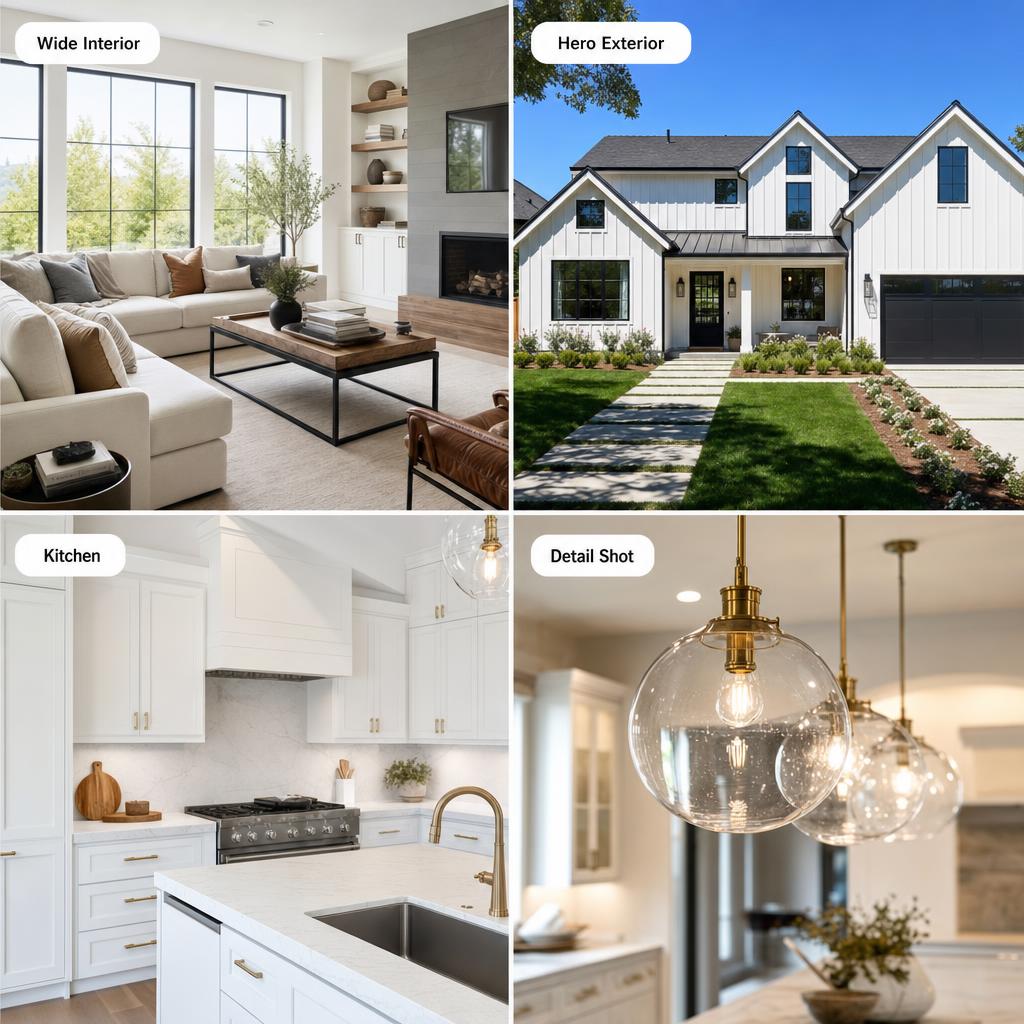
1. Lead with a Strong Hero Exterior
The exterior shot is almost always the opening frame of a listing video. A weak hero exterior means a weak first impression.
What makes a strong hero exterior:
- Shot during golden hour or on an overcast day — no harsh mid-day shadows
- Clear sky or soft cloud cover, not blown out to white
- Full property in frame, ideally with landscaping or street context
- No vehicles parked in front if avoidable
If your photo set has multiple exterior angles, pick the strongest one as your primary. The others can appear later in the video as supporting context shots.
2. Shoot Wide — One Per Room
Wide interior shots show volume. They give buyers a sense of how space flows room to room, and they give the AI the most material to animate with motion effects.
- Shoot from corners or doorways to capture as much of each room as possible
- The minimum set: living room, primary bedroom, main bathroom
- Add dining room, secondary bedrooms, and any bonus spaces if the property has them
Consistency matters here. Each room should feel like it belongs to the same shoot — similar light quality, same camera height.
3. Give the Kitchen Its Own Dedicated Shot
The kitchen is the highest-value room in most residential listings and warrants its own shot rather than being grouped with general interiors.
- Frame from a corner to show both the counter run and any island or dining connection
- Overhead lights on, natural window light not blown out
- Counters clear of clutter before shooting
A strong kitchen shot often becomes the second or third scene in the AI-generated video. Do not skip it or rely on a medium-shot detail as a substitute.
4. Add Detail Shots for Character
Detail shots break up the wide-angle rhythm and highlight the features buyers actually remember. They also give the AI variety to fill time between room sequences.
Good details to include:
- Statement light fixtures (pendant lights, chandeliers)
- Fireplace or built-in shelving
- Pool, hot tub, or outdoor kitchen
- View from a key window
- Any recently renovated feature — new tile, new hardware, updated cabinetry
Aim for at least 3–5 detail shots in any set of 15 or more photos.
5. Keep Exposure Consistent Across the Full Set
This is the single most important quality factor for AI video, and it is the one agents most often overlook.
When the AI sequences photos with inconsistent exposure — cutting from a dark bedroom to a blown-out kitchen — the video looks choppy regardless of how good the individual photos are. The AI cannot compensate for brightness jumps the way a human editor would.
What to ask your photographer: Request HDR-blended interiors. Every modern real estate photographer brackets exposures and blends them — this is standard practice. If your set has outliers, ask for reprocessed versions. Most photographers will re-export at no charge.
A quick test: open your photo set as a slideshow at two seconds per image. If any frame makes you blink or squint, it is too bright or too dark relative to the rest of the set.
6. Match White Balance Across All Interiors
Related to exposure but separate: rooms shot at different times of day, or with mixed artificial and natural light, can produce a set where some rooms look warm and orange and others look cool and blue.
The AI assembles these in sequence, and the color temperature jumps are immediately noticeable in the final video.
Ask for consistent white balance treatment across all interior shots, or request that your photographer re-process any room that reads noticeably warmer or cooler than the rest.
7. Cut Photos That Do Not Add Value
The AI will use what you give it. Giving it fewer, stronger photos produces a tighter video than giving it everything and hoping it selects the best ones.
Cut these before uploading:
- Laundry rooms with no distinguishing features
- Two or three nearly identical shots of the same room
- Utility spaces — electrical room, water heater alcove
- Photos taken before staging was complete
A 15-photo set with all four photo types covered will always outperform a 30-photo set with duplicates and filler.
Recommended 15-Photo Set
| # | Shot Type |
|---|---|
| 1 | Hero exterior |
| 2–3 | Living room (wide + detail) |
| 4–5 | Kitchen (wide + counter detail) |
| 6–7 | Primary bedroom (wide + detail) |
| 8 | Primary bathroom |
| 9 | Secondary bedroom |
| 10 | Secondary bathroom or powder room |
| 11–12 | Outdoor living or backyard |
| 13 | Dining room or open-plan overview |
| 14 | Statement feature (fireplace, view, built-ins) |
| 15 | Street or neighbourhood context shot |
Key Takeaways
- Always include a hero exterior, wide interiors (one per room), a kitchen shot, and detail shots.
- Consistent exposure across the full set is the single biggest quality factor — ask for HDR-blended interiors.
- Match white balance across all interior shots to avoid color temperature jumps in the video.
- Cut duplicate and filler photos before uploading — fewer, stronger photos produce a tighter result.
- A 15-photo set following this structure will outperform a larger, unfiltered set every time.
Related reading
Frequently asked questions
-
How many listing photos do I need for an AI real estate video?
A minimum of 8 photos works, but 15–25 is the sweet spot. Cover the four core types: hero exterior, wide interior shots, a bright kitchen, and detail shots. More photos give the AI more variety to choose from, but quality and coverage matter more than quantity. -
What is the single most important photo quality factor for AI real estate video?
Consistent exposure across the set. Photos that vary wildly in brightness — a dark bedroom next to a blown-out kitchen — make the AI-assembled video look choppy. Ask your photographer to bracket exposures and HDR-blend the interiors so the entire set reads at the same brightness level. -
Do I need to reshoot my listing photos for AI real estate video?
No. The photos you already use for the MLS work fine in most cases. Just make sure your set includes the four core types and that exposure is consistent. If you have a mix of very dark and very bright shots, consider asking your photographer for reprocessed versions. -
Should listing photos be landscape or portrait orientation for AI video?
Landscape (horizontal) photos work best for widescreen 16:9 video and MLS use. AI tools like BetterSpace can work with portrait photos for vertical 9:16 Reels, but exterior and wide interior shots should always be landscape. Portrait shots work well for detail and feature close-ups. -
Does photo resolution affect AI real estate video quality?
Yes, but the threshold is low. Any photo over 2 megapixels is sufficient for HD video export. MLS-resolution exports from your photographer are more than adequate.